library(shiny)
library(tidyAML)
library(recipes)
library(DT)
library(glmnet)Introduction
Welcome to the {tidyAML} Model Builder, a Shiny web application that allows you to build predictive models using the tidyAML and Parsnip packages in R.
Let’s dive into the code to understand how it works!
Load Libraries
First, we load the necessary packages:
shinytidyAMLrecipesDTglmnet.
UI
Next, we define the user interface (UI) of the Shiny app using the fluidPage() function from the shiny package. The UI consists of a title panel, a sidebar panel, and a main panel.
ui <- fluidPage(
  titlePanel("TidyAML Model Builder"),
  sidebarLayout(
    sidebarPanel(
      fileInput("file", "Upload your data file (csv or txt):"),
      selectInput(
        "dataset",
        "Choose a built-in dataset:",
        choices = c("mtcars", "iris")
      ),
      selectInput(
        "predictor_col",
        "Select the predictor column:",
        choices = NULL
      ),
      selectInput(
        "model_type",
        "Select a model type:",
        choices = c("regression", "classification")
      ),
      selectInput(
        "model_fn",
        "Select a model function:",
         choices = c("lm", "glm", "glmnet")
      ),
      actionButton("build_model", "Build Model"),
      verbatimTextOutput("recipe_output")
    ),
    mainPanel(
      verbatimTextOutput("model_table")
    )
  )
)
The sidebarPanel() contains several input elements that allow the user to specify the dataset, the predictor column, the type of model, and the model function. There is also an input element that allows the user to upload their own data file. The actionButton() is used to trigger the model building process. Finally, the verbatimTextOutput() element is used to display the output of the model building process.
The mainPanel() contains a single verbatimTextOutput() element that displays the output of the model building process.
Next, we define the server function, which is responsible for handling the user inputs and building the predictive models. The server function takes three arguments:input, output, and session.
server <- function(input, output, session){
  ...
}
We start by defining a reactive expression called data. This expression reads in the user-specified dataset or data file and updates the predictor_col select input with the names of the columns of the dataset.
data <- reactive({
if (!is.null(input$file)) {
df <- read.csv(
input$file$datapath,
header = TRUE,
stringsAsFactors = FALSE
)
updateSelectInput(
session,
"predictor_col",
choices = names(df)
)
return(df)
} else if (!is.null(input$dataset)) {
df <- get(input$dataset)
updateSelectInput(
session,
"predictor_col",
choices = names(df)
)
return(df)
}
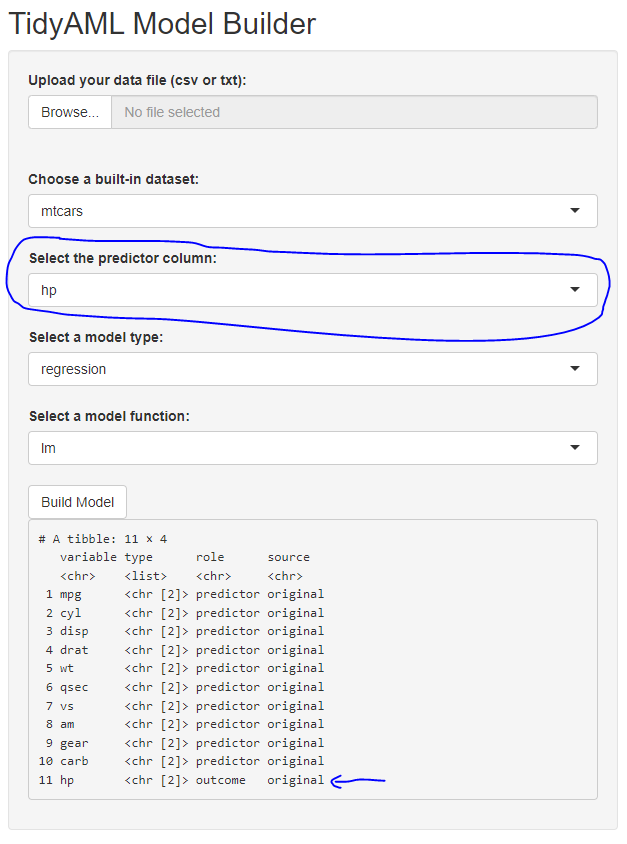
})The first reactive expression, data, reads in the data file uploaded by the user or selects a built-in dataset, depending on which option the user chooses. If the user uploads a file, the read.csv() function is used to read the data file into a data frame. If the user selects a built-in dataset, the get() function is used to retrieve the data frame associated with that dataset. In both cases, the column names of the data frame are used to update the choices in the predictor_col select input, so that the user can select which column to use as the predictor variable.
The next reactive expression, recipe_obj, creates a recipe object based on thepredictor_col selected by the user and the data frame returned by data(). The as.formula() function is used to create a formula that specifies the predictor column as the response variable and all other columns as the predictors. The resulting formula is passed to the recipe() function, along with the data frame. The step_normalize() function is then used to standardize all numeric predictors (except for the outcome variable) to have a mean of 0 and a standard deviation of 1. The resulting recipe object is returned by the reactive expression.
  recipe_obj <- eventReactive(input$predictor_col, {
    rec <- recipe(as.formula(paste(input$predictor_col, "~ .")),
                  data = data()) |>
      step_normalize(all_numeric(), -all_outcomes())

    return(rec)
  })
The model_fn reactive expression uses a switch() statement to determine which model function to use based on the model_fn select input. The available options are "lm" (for linear regression), "glm" (for generalized linear models), and "glmnet" (for regularized linear models).
model_fn <- reactive({
switch(
input$model_fn,
"lm" = "lm",
"glm" = "glm",
"glmnet" = "glmnet"
)
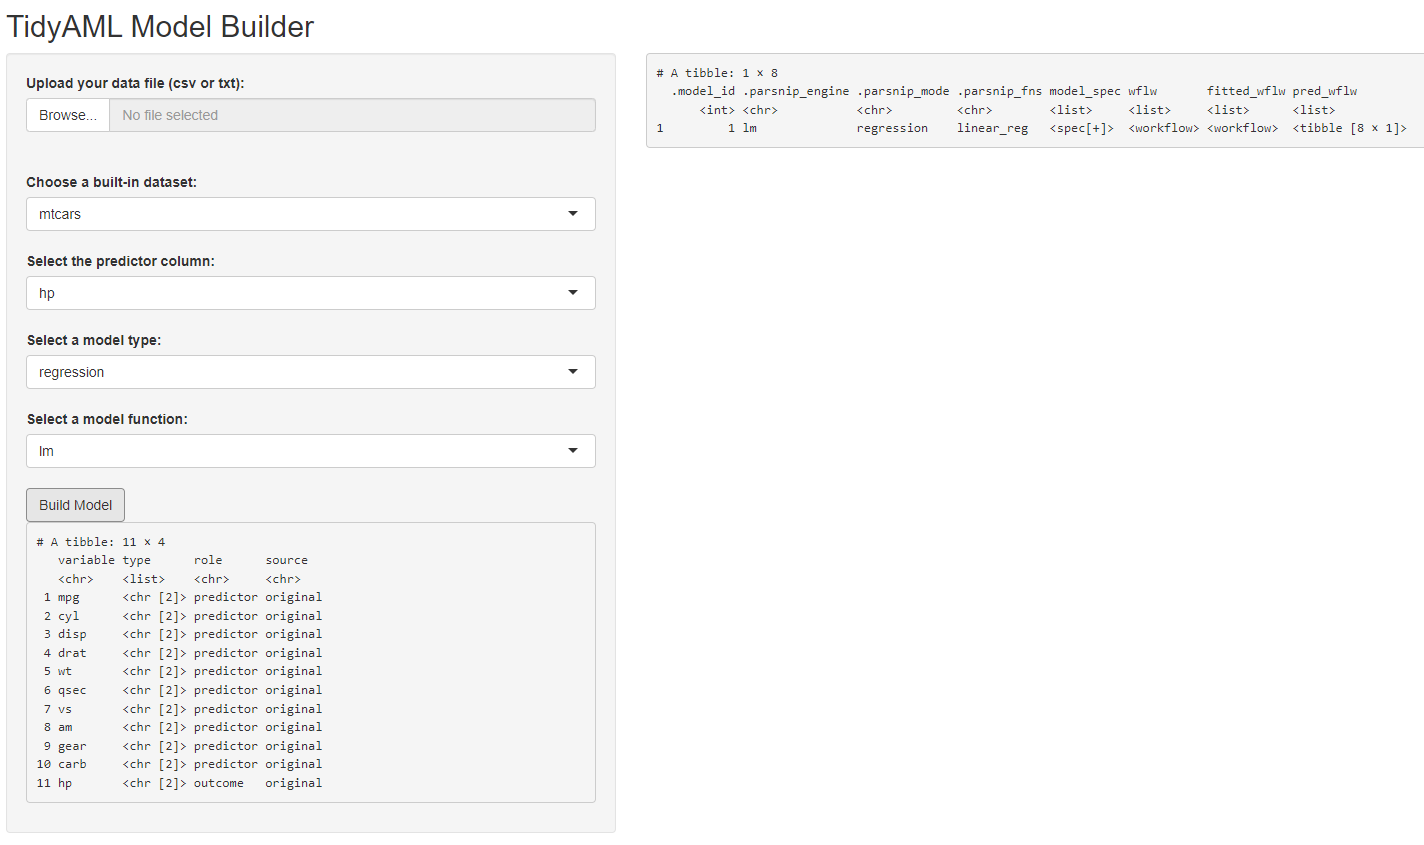
})The last reactive expression, model, uses the fast_regression() or fast_classification() functions from the tidyAML package to build a regression or classification model based on the data, recipe, and model function selected by the user. The resulting model object is returned by the reactive expression.
  model <- eventReactive(input$build_model, {
    if (input$model_type == "regression") {
      mod <- fast_regression(
        .data = data(),
        .rec_obj = recipe_obj(),
        .parsnip_eng = model_fn()
      )
    } else if (input$model_type == "classification") {
      mod <- fast_classification(
        .data = data(),
        .rec_obj = recipe_obj(),
        .parsnip_eng = model_fn()
      )
    }
    return(mod)
  })
Finally we output the summary of the recipe_obj and print the resulting tibble of model(s) to the screen.
  output$recipe_output <- renderPrint({
    if (!is.null(input$predictor_col)) {
      summary(recipe_obj())
    }
  })

  output$model_table <- renderPrint({
    if (input$build_model > 0) {
      print(model())
    }
  })
And of course, we cannot serve our app until we run the following line:
shinyApp(ui = ui, server = server)I hope you have enjoyed this post. Please steal this code and see what you can do with it. I am trying to figure out how to print the tibble using the DT package so maybe in another post.
Full Shiny App
Here are some pictures 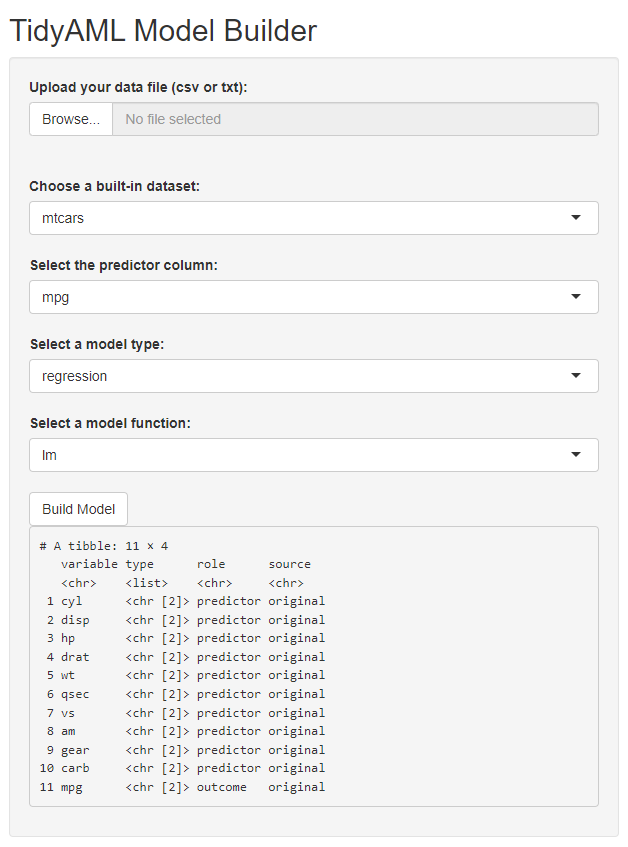

library(shiny)
library(tidyAML)
library(recipes)
library(DT)
library(glmnet)

ui <- fluidPage(
  titlePanel("TidyAML Model Builder"),
  sidebarLayout(
    sidebarPanel(
      fileInput("file", "Upload your data file (csv or txt):"),
      selectInput("dataset",
                  "Choose a built-in dataset:",
                  choices = c("mtcars", "iris")
                  ),
      selectInput("predictor_col",
                  "Select the predictor column:",
                  choices = NULL
                  ),
      selectInput("model_type",
                  "Select a model type:",
                  choices = c("regression", "classification")),
      selectInput("model_fn", "Select a model function:",
                  choices = c("lm", "glm", "glmnet")
                  ),
      actionButton("build_model", "Build Model"),
      verbatimTextOutput("recipe_output")
    ),
    mainPanel(
      verbatimTextOutput("model_table")
    )
  )
)

server <- function(input, output, session) {

  data <- reactive({
    if (!is.null(input$file)) {
      df <- read.csv(
        input$file$datapath,
        header = TRUE,
        stringsAsFactors = FALSE
        )
      updateSelectInput(
        session,
        "predictor_col",
        choices = names(df)
        )
      return(df)
    } else if (!is.null(input$dataset)) {
      df <- get(input$dataset)
      updateSelectInput(
        session,
        "predictor_col",
        choices = names(df)
        )
      return(df)
    }
  })

  recipe_obj <- eventReactive(input$predictor_col, {
    rec <- recipe(as.formula(paste(input$predictor_col, "~ .")),
                  data = data()
                  ) |>
      step_normalize(all_numeric(), -all_outcomes())
    return(rec)
  })

  model_fn <- reactive({
    switch(input$model_fn,
           "lm" = "lm",
           "glm" = "glm",
           "glmnet" = "glmnet")
  })

  model <- eventReactive(input$build_model, {
    if (input$model_type == "regression") {
      mod <- fast_regression(.data = data(),
                             .rec_obj = recipe_obj(),
                             .parsnip_eng = model_fn())
    } else if (input$model_type == "classification") {
      mod <- fast_classification(.data = data(),
                                 .rec_obj = recipe_obj(),
                                 .parsnip_eng = model_fn())
    }
    return(mod)
  })

  output$recipe_output <- renderPrint({
    if (!is.null(input$predictor_col)) {
      summary(recipe_obj())
    }
  })

  output$model_table <- renderPrint({
    if (input$build_model > 0) {
      print(model())
    }
  })

}

shinyApp(ui = ui, server = server)
Voila!